Authentication & Authorization in spring MVC project
Login is the first step that every developer performs while creating an application. Creating a Login with a simple database is a straightforward process, but in projects, a simple Login is insufficient for any real-world application. For the real application, user access is granted based on their roles for each login. For example, if the user has the role of Admin, Admin must have more access privileges than a user with the role of Manager.
Spring provides a security framework for implementing the Login with access privileges.
Spring security has two modules to provide access privileges.
a) Authentication: This is the procedure of validating the username against the database password. If the username and password entered in the Login form match the saved information in the database, the user is granted access to the application.
b) Authorization: If you wish to grant access to your application based on specified roles, authorization is used. This module grants users access to URL mappings based on their roles.
Let’s begin with the implementation of Login with spring security:

Step1: Adding of Spring security dependencies:
Spring security framework comprises of spring-security-web and spring-security-config.
<dependency>
<groupId>org.springframework.security</groupId>
<artifactId>spring-security-web</artifactId>
<version>${springsecurity.version}</version>
</dependency>
<dependency>
<groupId>org.springframework.security</groupId>
<artifactId>spring-security-config</artifactId>
<version>${springsecurity.version}</version>
</dependency>
Note: Spring Framework and Spring Security are separate projects, therefore if you enable spring security in spring core framework, both should be version compatible.
Step 2: Initialization of servlet container:
To initialize the servlet container and to initialize the spring security in the project require the implementation of a class that inherits the AbstractSecurityWebApplicationInitializer

This class registers the security filters in the project, and each web request is routed via the security filters for authorization.

Step 3: Set up the web security configuration class:
To create the configuration class inherit WebSecurityConfigurerAdapter and override the two methods configure(AuthenticationManagerBuilder auth) and configure(HttpSecurity HTTP) and annotate with the @Configuration annotation and @Enable WebSecurity annotation.
The method configure(AuthenticationManagerBuilder auth) is used to configure login credentials authentication, while configure(HttpSecurity HTTP) is used to configure authorization for filtering web requests in web applications.

Let’s see how to configure the configure(AuthenticationManagerBuilder auth) method for in-memory or JDBC authentication:
@Override
protected void configure(AuthenticationManagerBuilder auth)
throws Exception {
// add our users for in memory authentication with roles
System.out.println(“in security method”);
UserBuilder users = User.withDefaultPasswordEncoder();
auth.inMemoryAuthentication()
.withUser(users.username(“john”).password(“test123”)
.roles(“EMPLOYEE”))
.withUser(users.username(“mary”).password(“test123”)
.roles(“EMPLOYEE”,”MANAGER”))
.withUser(users.username(“susan”).password(“test123”)
.roles(“EMPLOYEE”,”ADMIN”));
}
For JDBC authentication replace the above method with the given method definition:
@Override
protected void configure(AuthenticationManagerBuilder auth)throws Exception {
// use jdbc authentication … oh yeah!!!
auth.jdbcAuthentication().dataSource(securityDataSource);
}
Let’s see the demo of configure(HttpSecurity HTTP) method for authorization of web requests based on user’s roles:
In the given demonstration, the antMatchers() method is used by to authorise web requests based on URL request mapping. For example, in the given demo, Manager has access to the request mapping /leaders, and the /leaders/** will be utilised to specify all the subdirectories of this request mapping leaders for the managers role.
@Override
protected void configure(HttpSecurity http) throws Exception {
http
//permitting all requests to be accessed
//Ensures that any request to our application requires the user to be authenticated based on their specific roles
.authorizeRequests()
.antMatchers(“/”).hasRole(“EMPLOYEE”)
//to access the further sub directories add ** in the path
.antMatchers(“/leaders/**”).hasRole(“MANAGER”)
.antMatchers(“/systems/**”).hasRole(“ADMIN”)
.and()
//Allows users to authenticate with form based login
.formLogin()
//directing to the request mapping defined in controller class to redirect to //the login jsp page
.loginPage(“/showMyLoginPage”)
//spring security authorize the user itself based on the username and //password information given in the authentication method
.loginProcessingUrl(“/authenticateTheUser”)
//We must grant all users (i.e. unauthenticated users) access to our log in page.
//The formLogin().permitAll() method allows granting access to all users //for all URLs associated with form based log in.
.permitAll()
.and()
//to add the logout support from the application
.logout()
.permitAll()
.and()
//to add the custom designed access denied page, for showing the custom //message the jstl tag library support is used in the Jsp page
.exceptionHandling()
.accessDeniedPage(“/accessdenie”);
}
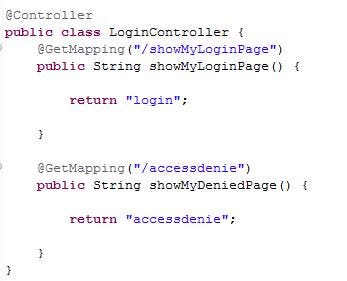
Step 4: Define the controller class:
After setting up the configuration class, the next step is to create the controller class for the request mapping of loginPage() and accessDeniedPage()
Step 6: Creating a custom login page
Custom messages are added to the login jsp to build the custom login page.
<body>
<div class=”login-form”>
<form:form action=”authenticateTheUser” method=”post”>
<! — To display the invalid username and password custom message on the web pplication→
<c:if test=”${param.error!= null}” >
<i>Sorry! You entered invalid username/password</i>
</c:if>
<! — To display the logout msg on the login screen →
<c:if test=”${param.logout!= null}” >
<i>You have been logged out</i>
</c:if>
<h2 class=”text-center”>Sign in</h2>
<div class=”form-group”>
<div class=”input-group”>
<span class=”input-group-addon”><i class=”fa fa-user”></i></span>
<input type=”text” class=”form-control” name=”username” placeholder=”Username” required=”required”>
</div>
</div>
<div class=”form-group”>
<div class=”input-group”>
<span class=”input-group-addon”><i class=”fa fa-lock”></i></span>
<input type=”password” class=”form-control” name=”password” placeholder=”Password” required=”required”>
</div>
</div>
<div class=”form-group”>
<button type=”submit” class=”btn btn-primary login-btn btn-block”>Sign in</button>
</div>
<div class=”clearfix”>
<label class=”pull-left checkbox-inline”><input type=”checkbox”> Remember me</label>
<a href=”#” class=”pull-right”>Forgot Password?</a>
</div>
<div class=”or-seperator”><i>or</i></div>
<p class=”text-center”>Login with your social media account</p>
<div class=”text-center social-btn”>
<a href=”#” class=”btn btn-primary”><i class=”fa fa-facebook”></i> Facebook</a>
<a href=”#” class=”btn btn-info”><i class=”fa fa-twitter”></i> Twitter</a>
<a href=”#” class=”btn btn-danger”><i class=”fa fa-google”></i> Google</a>
</div>
</form:form>
<p class=”text-center text-muted small”>Don’t have an account? <a href=”#”>Sign up here!</a></p>
</div>
</body>
</html>
In the preceding demonstration, custom messages for invalid usernames and passwords are displayed on the login page, and the logout custom message is also displayed on the login page. To implement this concept the security Jstl tag librarary will be used. To use this tag library, firstly the given dependency has to be added into the POM file:
<dependency>
<groupId>org.springframework.security</groupId>
<artifactId>spring-security-taglibs</artifactId>
<version>${springsecurity.version}</version>
</dependency>
The tag library can be utilized in the JSP file implementation after successfully adding the dependency to the POM file. To enable the JSTL in JSP, place the following code at the top of the JSP file:
<%@ taglib prefix=”c” uri=”http://java.sun.com/jsp/jstl/core" %>
Step 6: Creating an access denied page
To add the custom message of accessdenied page to the unauthorized user, create a JSP page with the custom message and add the support for redirecting the user to the home page of the web application.
<%@ page language=”java” contentType=”text/html; charset=ISO-8859–1"
pageEncoding=”ISO-8859–1" isELIgnored=”false”%>
<!DOCTYPE html>
<html>
<body>
<p>You are not authorize to access this page!</p>
<div>
<! — This will redirect the user to the home page of the web application →
<a href=”${pageContext.request.contextPath}/”>Back to the Home Page</a>
</div>
</body>
</html>
Step 7: Application is ready with the spring security features.
Also, keep in mind that spring security manages the automatic generation of session tokens. It assigns a unique token ID to each newly established session; the user is not required to generate one manually.
The source code can be found at the following link:
https://github.com/vaishaliarya/Spring/tree/main/security-demo